Sveltos Templating: Cilium Cluster Mesh in One Run

Introduction
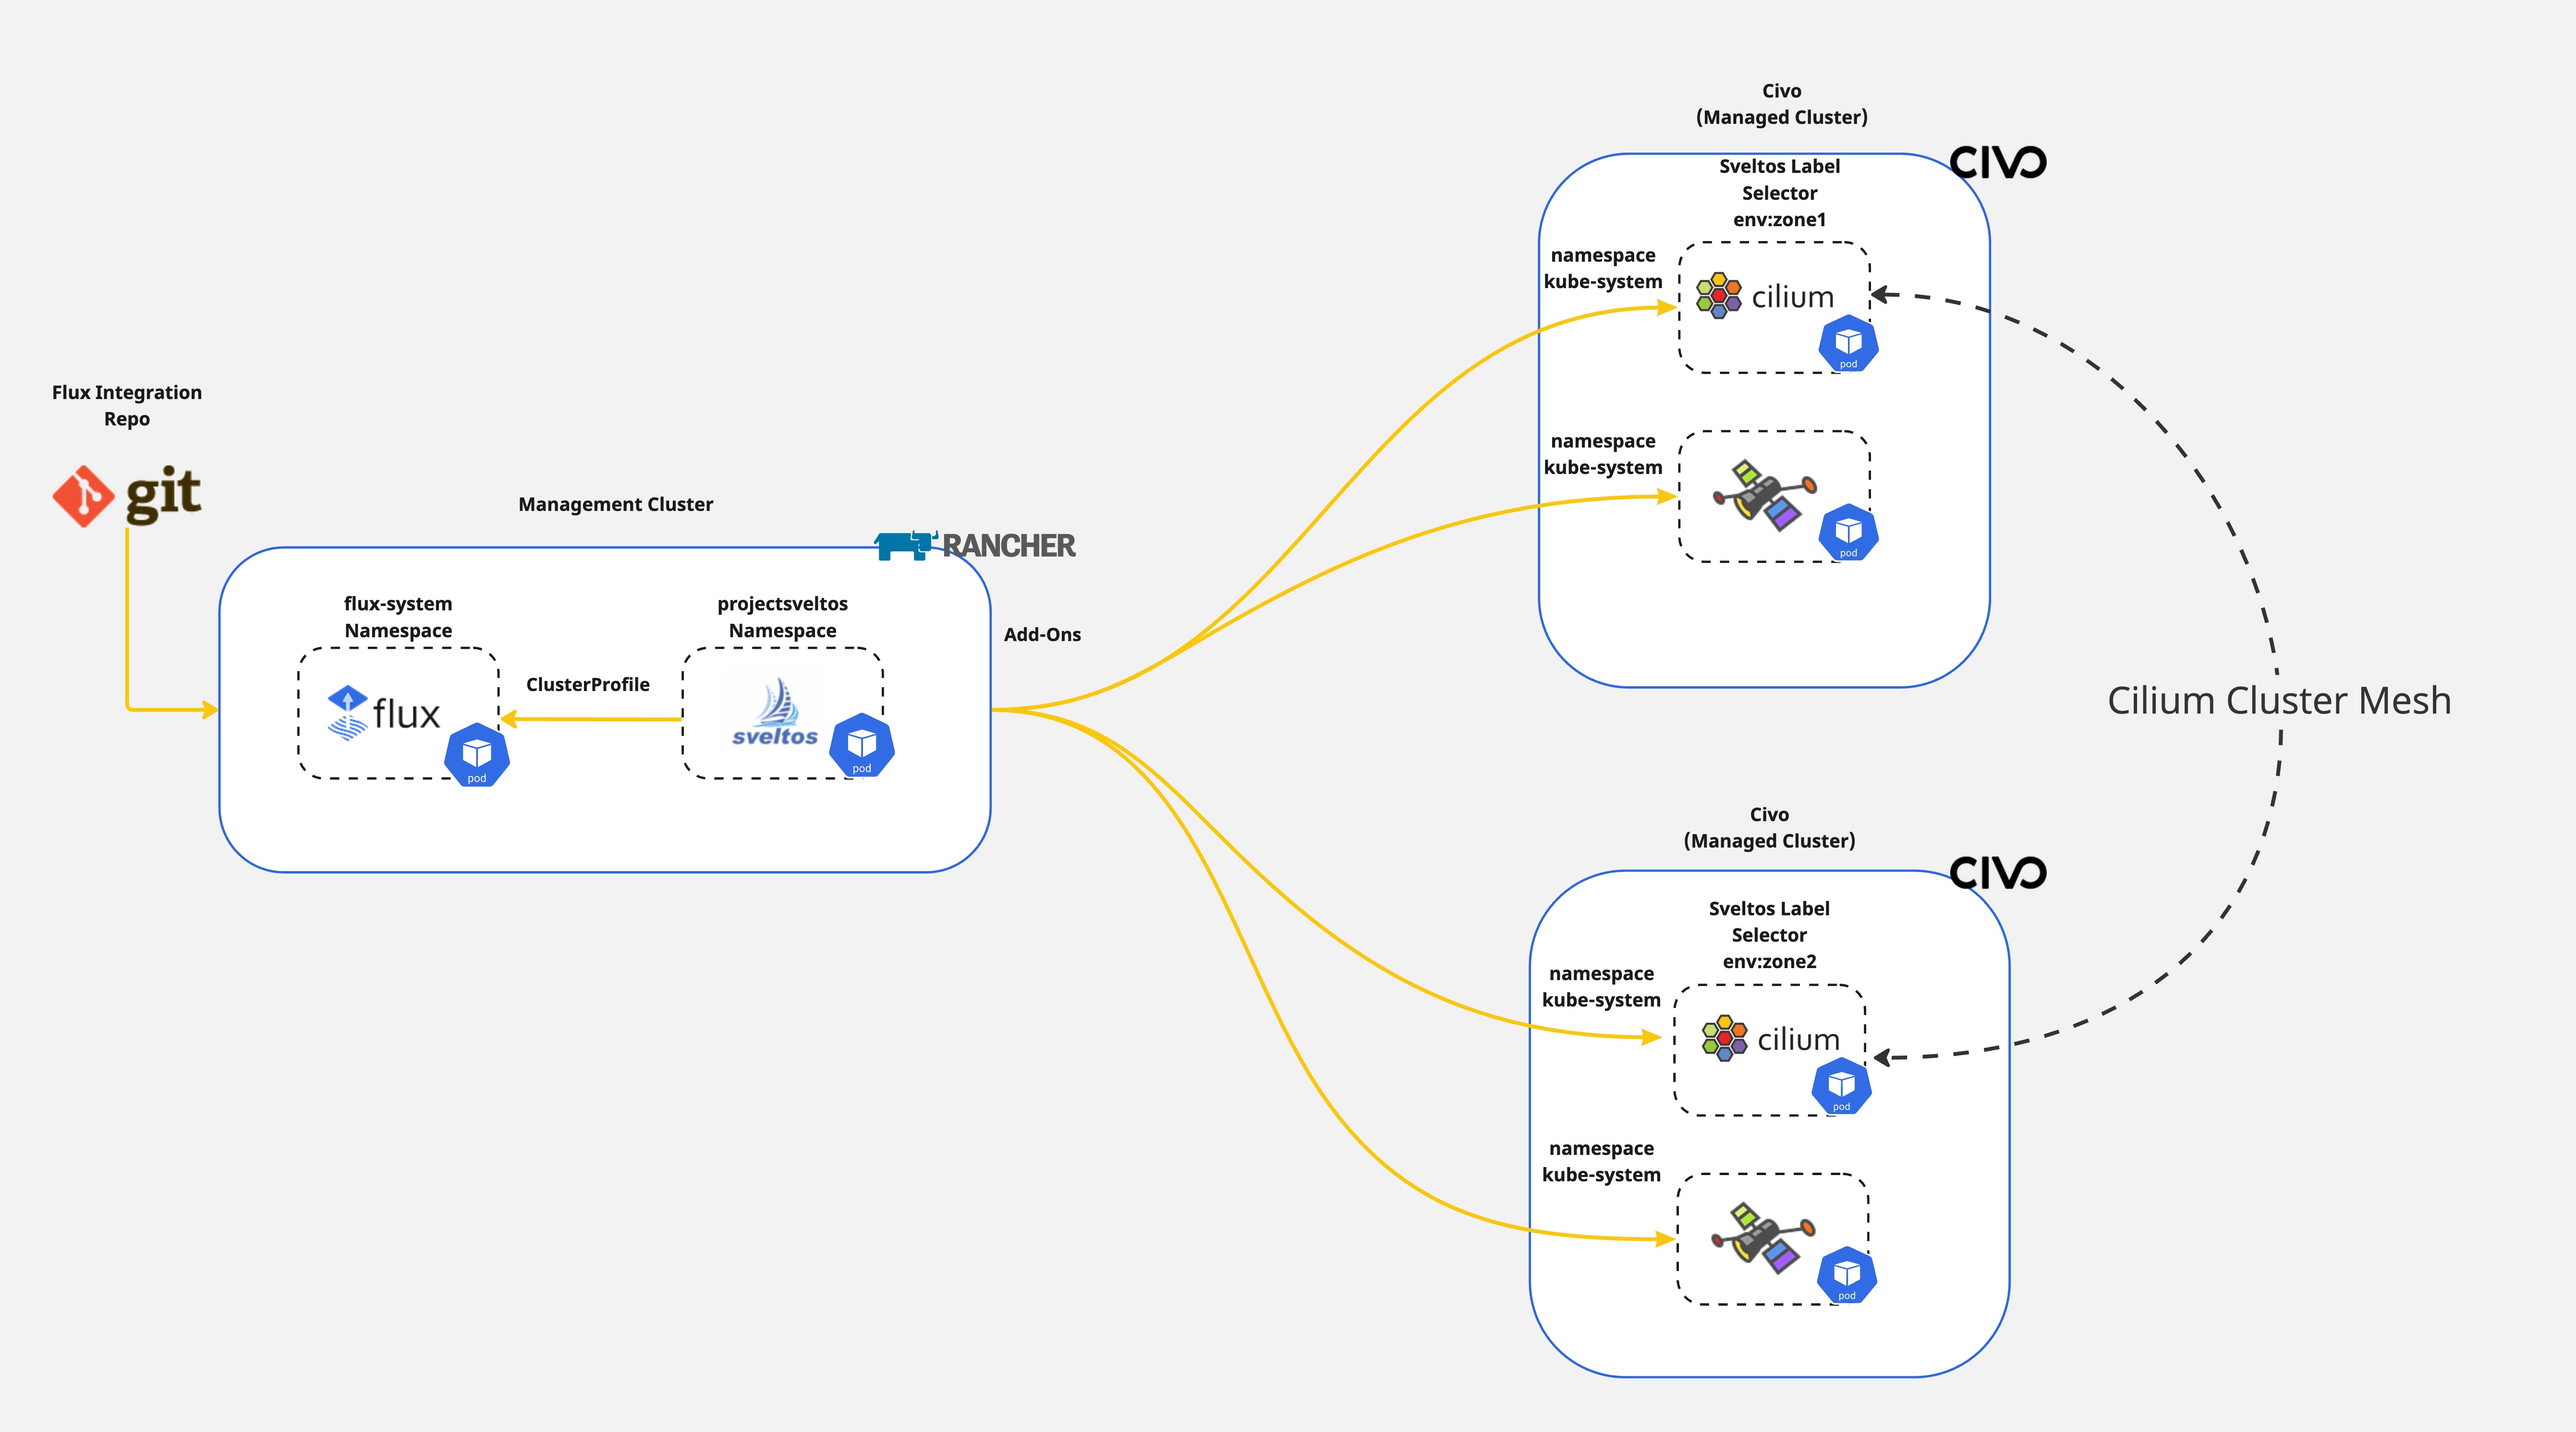
Have you ever wondered how to dynamically instantiate Kubernetes resources before deploying them to a cluster? What if I tell you there is an easy way to do it? Sveltos lets you define add-ons and applications using templates. Before deploying any resource down the managed clusters, Sveltos instantiates the templates using information gathered from the management cluster.
In a previous post, we outlined a step-by-step approach to forming a Cilium cluster mesh between two clusters. In today's post, we will demonstrate how the Sveltos templating is used to deploy a Cilium cluster mesh dynamically in one go.
Lab Setup
+-----------------+-------------------+--------------------------+
|   Cluster Name  |        Type       |         Version          |
+-----------------+-------------------+--------------------------+
|   mgmt          | Mgmt Cluster      |      v1.28.9+rke2r1      |
|  mesh01         | Managed Cluster   |      v1.29.2+k3s1        |
|  mesh02         | Managed Cluster   |      v1.29.2+k3s1        |
+-----------------+-------------------+--------------------------+

+-------------+----------+
|  Deployment | Version  |
+-------------+----------+
|    Cilium   | v1.15.6  |
|  sveltosctl | v0.32.0  |
+-------------+----------+
Prerequisites
To follow along, ensure the below are satisfied.
- A management cluster with Sveltos installed
- kubectl installed
- sveltosctl installed
If you are unaware of how to install Sveltos in a Kubernetes cluster, follow the instructions mentioned here.
Step 1: Register Clusters with Sveltos
For this demonstration the Civo Kubernetes cluster offering was used. Once the clusters are ready, it is time to proceed with the Sveltos cluster registration. To do that, we will utilise sveltosctl and generate a new kubeconfig file.
$ sveltosctl register cluster --namespace=<namespace> --cluster=<cluster name> \
    --kubeconfig=<path to Sveltos file with Kubeconfig> \
    --labels=key=value
Example - mesh01 registration
$ sveltosctl register cluster --namespace=civo --cluster=mesh01 \
    --kubeconfig=/home/test/mesh01.yaml \
    --labels=cilium=zone01
We will register the clusters with Sveltos on the mentioned namespace, name, and will attach the cluster labels cilium=zone01 and cilium=zone02 respectively.
If the namespace does not exist in the management cluster, the command will fail with the namespace not found error. Ensure the defined namespace exists in the cluster before registration.
Validation
$ export KUBECONFIG=<Sveltos managament cluster>

$ kubectl get sveltoscluster -A --show-labels
NAMESPACE   NAME     READY   VERSION          LABELS
civo        mesh01   true    v1.29.2+k3s1     cilium=zone01
civo        mesh02   true    v1.29.2+k3s1     cilium=zone02
mgmt        mgmt     true    v1.28.9+rke2r1   sveltos-agent=present
Step 2: Deploy Cilium Cluster Mesh ConfigMap
Before we even start working with the Sveltos templating, we will deploy two ConfigMap resources that include the Cilium Cluster Mesh configuration.
Example - mesh01 ConfigMap
apiVersion: v1
kind: ConfigMap
metadata:
  name: cilium-config-mesh01
  namespace: civo
data:
  id: "1"
  k8sServiceHost: "74.220.x.x"
  k8sServicePort: "6443"
  nodePort: "32379"
  crt: "Define the base64 ca.crt"
  key: "Define the base64 ca.key"
  clusterPoolIPv4PodCIDRList: "10.244.0.0/16"
  peermeshname: "mesh02"
  peermeship: "192.168.x.x"
  peermeshport: "32380"
From the YAML definition, it is clear the resources we would like to deploy are in a key-value format. The ConfigMap for both clusters contains the required information to form a Cilium cluster mesh seamlessly.
Deploy ConfigMap Management Cluster
$ export KUBECONFIG=<Sveltos managament cluster>

$ kubectl apply -f config_mesh01.yaml,config_mesh02.yaml

$ kubectl get cm -n civo
NAME                   DATA   AGE
cilium-config-mesh01   10     9s
cilium-config-mesh02   10     5s
kube-root-ca.crt       1      23m
As the Kubernetes managed clusters are registered in the civo namespace, the ConfigMaps are defined there.
Step 3: Deploy Sveltos ClusterProfile
We will create a Sveltos ClusterProfile to install Cilium as a CNI alongside the Hubble UI and Cilium cluster mesh by instantiating the configuration from the information located in the ConfigMap created in previous step.
Example - mesh01 ClusterProfile
apiVersion: config.projectsveltos.io/v1beta1
kind: ClusterProfile
metadata:
  name: cilium-1156-zone01
spec:
  clusterSelector:
    matchLabels:
      cilium: zone01
  templateResourceRefs:
  - resource:
      apiVersion: v1
      kind: ConfigMap
      name: cilium-config-{{ .Cluster.metadata.name }}
    identifier: CiliumConfig
  helmCharts:
  - chartName: cilium/cilium
    chartVersion: 1.15.6
    helmChartAction: Install
    releaseName: cilium
    releaseNamespace: kube-system
    repositoryName: cilium
    repositoryURL: https://helm.cilium.io/
    values: |
      tls:
        ca:
          cert: {{ (getResource "CiliumConfig").data.crt }}
          key: {{ (getResource "CiliumConfig").data.key }}
      cluster:
        id: {{ (getResource "CiliumConfig").data.id }}
        name: {{ .Cluster.metadata.name }}
      clustermesh:
        apiserver:
          replicas: 2
          service:
            type: NodePort
            nodePort: {{ (getResource "CiliumConfig").data.nodePort }}
          tls:
            authMode: cluster
            server:
              extraDnsNames:
                - "{{ .Cluster.metadata.name }}.mesh.cilium.io"
        config:
          clusters:
          - address: ""
            ips:
            - {{ (getResource "CiliumConfig").data.peermeship }} # The Node IP of the available nodes or a resolvable hostname
            name: {{ (getResource "CiliumConfig").data.peermeshname }}
            port: {{ (getResource "CiliumConfig").data.peermeshport }}
          enabled: true
          domain: "mesh.cilium.io"
        useAPIServer: true # This is required for the Cluster Mesh setup
      kubeProxyReplacement: true
      k8sServiceHost: {{ (getResource "CiliumConfig").data.k8sServiceHost }}
      k8sServicePort: {{ (getResource "CiliumConfig").data.k8sServicePort }}
      hubble:
        enabled: true
        peerService:
          clusterDomain: cluster.local
        relay:
          enabled: true
        tls:
          auto:
            certValidityDuration: 1095
            enabled: true
            method: helm
        ui:
          enabled: true
      nodeinit:
        enabled: true
      ipam:
        mode: cluster-pool
        operator:
          clusterPoolIPv4MaskSize: "24"
          clusterPoolIPv4PodCIDRList:
            - {{ (getResource "CiliumConfig").data.clusterPoolIPv4PodCIDRList }}
      nodePort:
        enabled: true
      debug:
        enabled: true
The ClusterProfile will get deployed to the managed clusters with the label set to cilium:zone01. Once a cluster is found, we instruct Sveltos to use the templateResourceRefs capability and use the details found in the ConfgiMap with the name set to cilium-config-{{ .Cluster.metadata.name }}. This will match the cilium-config-mesh01 and cilium-config-mesh02 ConfigMap. Then, we instruct Sveltos to install the Cilium Helm chart v1.15.6.
For the Cilium Helm chart instantiation, we go through the ConfigMap and populate the values based on the key definition.
We deploy a Cilium cluster mesh with a common TLS certificate and a NodePort service. For the production environment, it is recommended to deploy a LoadBalancer setup. The above template can be used by updating the clustermesh.service.type=LoadBalancer and setting the standard service Port.
Deploy ClusterProfile Management Cluster
$ export KUBECONFIG=<Sveltos managament cluster>

$ kubectl apply -f clusterprofile_mesh01.yaml,clusterprofile_mesh02.yaml
Step 4: Validate Results
Validation - sveltosctl
$ ./sveltosctl show addons
+-------------+---------------+-------------+--------+---------+--------------------------------+-----------------------------------+
|   CLUSTER   | RESOURCE TYPE |  NAMESPACE  |  NAME  | VERSION |              TIME              |             PROFILES              |
+-------------+---------------+-------------+--------+---------+--------------------------------+-----------------------------------+
| civo/mesh01 | helm chart    | kube-system | cilium | 1.15.6  | 2024-08-10 22:38:33 +0200 CEST | ClusterProfile/cilium-1156-zone01 |
| civo/mesh02 | helm chart    | kube-system | cilium | 1.15.6  | 2024-08-10 22:38:55 +0200 CEST | ClusterProfile/cilium-1156-zone02 |
+-------------+---------------+-------------+--------+---------+--------------------------------+-----------------------------------+
Validation - mesh01
$ kubectl exec -it -n kube-system cilium-888jc -c cilium-agent -- cilium-dbg troubleshoot clustermesh mesh02
Found 1 remote cluster configurations
Troubleshooting filtered subset of clusters: mesh02

Remote cluster "mesh02":
📄 Configuration path: /var/lib/cilium/clustermesh/mesh02

🔌 Endpoints:
   - https://mesh02.mesh.cilium.io:32380
     ✅ Hostname resolved to: 192.168.x.x
     ✅ TCP connection successfully established to 192.168.x.x:32380
     ✅ TLS connection successfully established to 192.168.x.x:32380
     ℹ️  Negotiated TLS version: TLS 1.3, ciphersuite TLS_AES_128_GCM_SHA256
     ℹ️  Etcd server version: 3.5.14

🔑 Digital certificates:
   ✅ TLS Root CA certificates:
      - Serial number:       2c:b4:43:9c:fb:82:62:4f:55:0f:eb:5e:a4:fe:af:5e:14:95:18:74
        Subject:             CN=Cilium LAB CA
        Issuer:              CN=Cilium LAB CA
        Validity:
          Not before:  2024-04-25 14:04:31 +0000 UTC
          Not after:   2034-04-23 14:04:31 +0000 UTC
   ✅ TLS client certificates:
      - Serial number:       13:8f:38:4e:e9:08:bb:81:93:20:ff:30:33:ed:fb:13
        Subject:             CN=remote-mesh01
        Issuer:              CN=Cilium LAB CA
        Validity:
          Not before:  2024-08-10 20:53:31 +0000 UTC
          Not after:   2027-08-10 20:53:31 +0000 UTC

⚙️ Etcd client:
   ✅ Etcd connection successfully established
   ℹ️  Etcd cluster ID: 820847063f6cabce
Validation - mesh02
$ kubectl exec -it -n kube-system cilium-94ddz -c cilium-agent -- cilium-dbg troubleshoot clustermesh mesh01
Found 1 remote cluster configurations
Troubleshooting filtered subset of clusters: mesh01

Remote cluster "mesh01":
📄 Configuration path: /var/lib/cilium/clustermesh/mesh01

🔌 Endpoints:
   - https://mesh01.mesh.cilium.io:32379
     ✅ Hostname resolved to: 192.168.x.x
     ✅ TCP connection successfully established to 192.168.x.x:32379
     ✅ TLS connection successfully established to 192.168.x.x:32379
     ℹ️  Negotiated TLS version: TLS 1.3, ciphersuite TLS_AES_128_GCM_SHA256
     ℹ️  Etcd server version: 3.5.14

🔑 Digital certificates:
   ✅ TLS Root CA certificates:
      - Serial number:       2c:b4:43:9c:fb:82:62:4f:55:0f:eb:5e:a4:fe:af:5e:14:95:18:74
        Subject:             CN=Cilium LAB CA
        Issuer:              CN=Cilium LAB CA
        Validity:
          Not before:  2024-04-25 14:04:31 +0000 UTC
          Not after:   2034-04-23 14:04:31 +0000 UTC
   ✅ TLS client certificates:
      - Serial number:       94:02:e1:4a:b8:74:4c:d7:62:af:c1:d8:19:a8:3b:8f
        Subject:             CN=remote-mesh02
        Issuer:              CN=Cilium LAB CA
        Validity:
          Not before:  2024-08-10 20:59:07 +0000 UTC
          Not after:   2027-08-10 20:59:07 +0000 UTC

⚙️ Etcd client:
   ✅ Etcd connection successfully established
   ℹ️  Etcd cluster ID: 21f7360bef94b707
Cilium cluster mesh is deployed in one run without the need for an additional Infrastructure as Code (IaC) tool or additional rendering!
![]()
Sveltos Templating Benefits
Sveltos templating enables users to utilise the same add-on configuration across different clusters while allowing variations like different add-on configuration values.
Sveltos lets users define add-ons and applications in a reusable way. We can deploy the definitions across multiple clusters with minor adjustments. The approach saves time, effort, and headaches, especially in large-scale environments.
Conclusions
In a couple of minutes and with a minimal configuration effort we formed a cluster mesh between two Kubernetes clusters. This is the power of Sveltos templating.
If you want to explore a step-by-step guide on how to setup a Cilium cluster mesh, have a look at my previous blog post here.
✉️ Contact
We are here to help! Whether you have questions, or issues or need assistance, our Slack channel is the perfect place for you. Click here to join us us.
👏 Support this project
Every contribution counts! If you enjoyed this article, check out the Projectsveltos GitHub repo. You can star 🌟 the project if you find it helpful.
The GitHub repo is a great resource for getting started with the project. It contains the code, documentation, and many more examples.
Thanks for reading!